BFR Blog
Sustainable Beauty Choices: Small Changes for a More Eco-Friendly Routine
Earth Day serves as an essential reminder that our everyday choices can significantly impact the health of our planet. Even our beauty routines offer numerous opportunities to make more sustainable choices.
3 Ways to Recreate Fall’s Hottest Trend - Bold Eyes + Smooth Skin
It’s officially fall as of September 22nd and I couldn’t be more excited about it! For me, fall means cooler weather, warm cookies, and lots of new trends! Fall is when everyone breaks out their most fashionable pieces and struts their glowing skin down the street. One trend I’ve been seeing a lot lately from runway to magazine shoots to beauty gurus Instagram’s is a bold graphic eye look paired with fresh, glowing skin. This makeup combination creates a striking look that turns heads and has everyone wondering if you just stepped off the NYFW catwalk.
Unexpected graphic eye looks seem to be a huge trend in the fashion and beauty industries this season. New York and London Fashion Weeks gave us a plethora of new graphic eye looks to try out. I’ve gathered together a few of my favorite looks and decided to recreate them using Beauty For Real products. Let’s get our catwalk on…

- Apply MVP Tinted Moisturizer to the skin to perfect your complexion and smooth any pores or fine lines. Add a little extra using your clean fingers in any areas where more coverage is desired. Be sure to keep skin soft and smooth.
- Apply MVP Concealer under eyes and brow bone to brighten up the eye area. I find it best to apply a light amount and use your fingers to tap into the skin for a skin finish.
- Take Blush + Glo in “Coral Crush + Hi Beam” and apply the blush shade to cheekbones and apples of the cheeks for a light flush.
- To complete the eyes, take I-LINE 24/7 eyeliner in “Storm” and apply on the lids and smudge upwards with a brush. Be sure to do one eye at a time and blend quickly, once these liners set they do not budge or smudge. Do the same under the lashline and blend out to connect the top and bottom. If you want to stay true to the inspiration, skip mascara and go for a clear gloss on the lashes to keep them natural. If you’re anything like me though, you won’t skip mascara! Go for the Hi Def Mascara in “Just Black”, the small and hollow wand allows for a dramatic application (just check out that before and after below!!).
- Finish the look by using Lip Revival Scrub to prep lips for liner and lip cream. Apply D-FINE Lip Pencil to outline and fill in lips and top it off by tapping on our “Barely There” Lip Cream + Color.
Look 2 - Chloé SS18 Makeup by Aaron De Mey

- Repeat steps one and two above for complexion perfection.
- Take Blush + Glo in “In The Pink + Get Lit” and apply the blush shade to the apples of the cheeks. Apply the blush very lightly on the skin, almost so it looks like there is barely any product on the skin. Apply the highlight to the tops of the cheekbones, down the bridge of the nose, and above the cupid’s bow.
- To complete the eyes, take I-LINE 24/7 eyeliner in “Black Magic” and apply along the upper lashline and wing the end of the eyes to create a cat eye. Take a very small brush and lightly blend the edges of the liner to give it more shape but to also smudge the edges so as to not create a sharp line. Apply the Black Magic to the bottom lashline and waterline and smudge out to connect to the wing of the cat eye. Apply a light layer of Hi Def Mascara to complete.
- For the lips, keep them natural! Exfoliate them using the Lip Revival Scrub and lightly define the lips to even them out. That’s the complete look!
Look 3 - Beauty For Real Photoshoot Makeup by Leslie Munsell

Photo by George Kamper
- Start by again smoothing the skin using steps one and two from Look 1.
- Take Blush + Glo in “In The Pink + Get Lit” and apply the blush shade to the cheekbones and apples of the cheeks. Apply the highlight to the tops of the cheekbones, down the bridge of the nose, and above the cupid’s bow.
- Apply Bronze + Glo in “Cocoa Cabana” to the top of the forehead where sunlight naturally hits the face. Apply a light amount of Cocoa Cabana under the cheekbones to sculpt the face a bit.
- Time for eyes! Apply I-LINE 24/7 eyeliner in “Black Magic” to the outer V of the eye area. From the far corner of your eye, apply upwards towards to brow and connect with your natural crease. Line the crease moving towards the center of the eye and blend all line and product well. This should leave most of your lid available to apply “In The Navy” eyeliner and blend into the Black Magic. Apply the Black Magic to the bottom lashline and waterline and smudge out to connect to the wing, keep the lines sharp and clean with a cotton swab. To finish, take I-LINE in “Champagne Buzz” and apply to the inner corners of the eyes to brighten this bold eye. Finish the eyes by applying a major layer of Hi Def Mascara for added drama and volume.
- Finish the look by using Lip Revival Scrub to prep lips for liner and lip cream. Apply D-FINE Lip Pencil to outline and fill in lips and top it off by gliding on “Kiss Me” Lip Gloss + Shine.
I had a great time recreating each of these looks on myself and cannot wait to see yours. If you give these a try, be sure to tag us and use hashtag #ImForReal to give us permission to repost!
Xoxo, Lyss
The Revolution Behind Cruelty-Free Cosmetics
By Caitlyn Halliburton
It doesn't take much to figure out that human beings aren't the only living creatures on this planet. Stretch that notion a little further, and it becomes quite obvious we also aren't the only creatures to experience pain and suffering. That being said, why is it we have found it acceptable to test chemicals on animals?

The first documented instances of animal testing go back to the 19th century. While we aren't sure how long animal testing has actually been going on, it's safe to say it's been a while. Naturally, as the cosmetics industry is reliant upon the mixing and formulating of different chemicals, the industry quickly fell into the practice of testing on animals in the early 1900's.
Before understanding why animal testing is harmful and unnecessary, it's important to understand what this process entails. As you probably already know, there are many different ingredients that go into many different types of cosmetic products. Every single ingredient is tested for its reaction to living organisms in its purest form. Therefore, when companies test their products on animals, they aren't simply swiping some mascara onto a little bunny's eyelid, they're bathing it in stearic acid to see whether or not it kills, causes inflammation, makes hair fall out, or produces any other undesirable side effect.
What this means is animals used for cosmetic testing are suffering the effects of each and every chemical in its purest and most potent form, even if a product only has a minute trace of a chemical..
What good does it do to put an animal through such suffering if humans aren't going to get this kind of exposure to the different chemicals in our products?
Furthermore, humans and species used for animal testing have different biological makeups. If you're not familiar with how chemistry works, different biological makeups mean different chemical compositions. Different chemical compositions mean different reactions to foreign chemicals. Simply put, testing chemicals on animals doesn't sufficiently determine what kind of effect those chemicals will have on human beings.

What we learn from this is animal testing is not only cruel, it's also an inaccurate measure of a chemical's effect on human beings.
So how can we accurately determine a chemical's effect on human beings?
Well, lucky for us, scientists are pretty good at their jobs and have already advanced new ways of testing chemicals for human use. Currently, there are cost-effective methods cruelty-free brands use in lieu of animal testing: computer generated models and human cell-based tests.
Since scientists learned how to split and clone cells in the early 1900's (anybody ever read The Immortal Life of Henrietta Lacks?), any kind of testing imaginable can be done with a 100% living human cell. Any chemical we think we want to put on our bodies for whatever reason can be tested accurately and relatively cheaply, considering our labs have a solid supply of human cells and can always get more if they need it.
Computer model testing is a fantastic feat in technology as it replicates a liver's reactions and chemical processes through complex algorithms. Basically, a computer is programmed with bodily functions to mimic a human's biological response to different chemicals. However cool this process is, it is also widely underused in chemical testing laboratories, which makes it's genius unresolved.
Both computer model and cell testing are humane forms of alternative testing that are proven to render more accurate results at a much lower cost than animal testing.
Fortunately, more and more countries realize this and are taking steps to ban this unreliable, cruel, and expensive practice. The United States has propositioned the Humane Cosmetics Act, which would prohibit animal testing on cosmetics. Despite legislation's slow action, many brands collaborate with humane societies in order to demonstrate their commitment to cruelty-free products.

Beauty For Real is one of those brands who have taken progressive steps in ensuring no animal goes harmed during the formation of our products. We have taken the necessary measures to become PETA approved as a sign of our dedication to a cruelty-free world. If you're ever wondering what products are officially cruelty-free, simply check the packaging for the little pink bunny logo.
The Two-Toned Eye Trend Everybody Loves
By Caitlyn Halliburton
We all love our original go-to eye looks, like the ever-elegant smoky eye or just a simple top and bottom line with your favorite black or brown eyeliner, but sometimes we just need to change it up.
Thankfully, there are no limits when it comes to eyeliner.
Try the hottest eye trend to spice up your makeup routine: the two-toned eye.
With this fun look, you don't have to decide between your favorite bold eyeliner and those easygoing neutral shades, you can just use both (who doesn't love Beauty For Real's In The Navy and 24 Karat 24/7 Waterproof I-Lines?).
So here's the concept:
- Pick two shades of eyeliner
- Apply one shade to the top lid
- Apply one shade on the bottom
At this very moment, I'm rocking BFR's Jade on my waterline and Champagne Buzz on my top lid. I'm not big into bold colors on my eyes, so I like this look because the Jade isn't overdone.
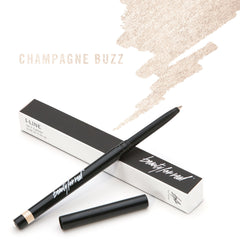
You don't always have to choose a bold shade and a neutral, though. If you work in a conservative setting, it might not be a good idea to go to work with blue eyeliner. But that's the great thing about this trend: it works with classic colors, too.
For a day at the office, when you just want to spice things up a bit, go for a light shade on bottom and a darker shade on top (or vice versa...this is all about making a trend your own!). Try shades like Beauty For Real's Whiskey I-Line and Champagne Buzz. The contrast in shades will give your eyes an added pop while still looking professional.
Ok, this sounds cool, but why is it so hot?
Using two-tones on your eyes give those beautiful windows to the soul an extra pop. Refer to the color wheel to help you out. The color wheel displays colors with their contrasting shades on the opposite side of the wheel. This shows you which colors make other colors pop well, particularly with your eye color and your eyeliner shade.
What are some other ways I can style this trend?
Try it with the upside-down eye trend.
The two-toned eye trend goes hand-in-hand with the upside-down eye trend. This is when the liner on the bottom is thick, like you would typically do on the top lid, and the liner on top is either nonexistent or very thin.
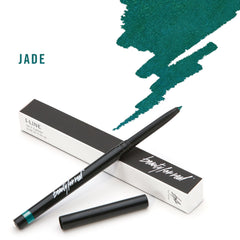
Play up the look by using the bolder shade on bottom and filling it in below your waterline. Then, using the lighter shade, draw a thin line on your top lid and voila! You're ready for a ladies' night.
Feeling extra creative?
Draw a winged eye either on top or bottom (back to the upside-down eye look).
This look is perfect for a night out, and with Beauty For Real's 24/7 I-Lines, you won't have to worry about your liner smudging away on the dance floor.
The two-toned eye trend is perfect for some pizzazz in your makeup routine. Pair the look with your favorite lip cream or lip gloss (I matched my Jade and 24 Karat combo with BFR's Lip Cream + Color in TropiCoral) and you're ready to go!
How To Take A Lip Selfie by Aubrey Boyle
Written by Guest Beauty Blogger Aubrey Boyle @maidofbeauty
Want to learn how to 'UP' your lip-selfie game? Read on. Lip product junkies LIVE for those swatches. Swatches are typically just a quick swipe on the inner forearm. But as you can tell from social media, makeup artists and beauty enthusiasts have taken it to a whole new level. We all want those crisp, even, smooth-skinned photos. WAAAA!! How do they do it? I'm here to tell all - Revealing some tips and tricks of my very own.
Bright as midday ...
Natural light or artificial? Well...both! I use artificial lighting, mainly because I do all my makeup, swatches and lip art at night (two kids = zero time for makeup play during the day). I'm not saying you have to go out and buy lighting, but if you're ever in the market for it, Glamcor and Diva Ring Light have some amazing lights.
For natural light, find the biggest window in your home that brings in the most light, or just step outside.
I spy ...
There is nothing more awkward and distracting than having your gallery wall in the background of your worthy, double-tap Instagram photo. Instead, use wrapping paper, or a yard of sparkly fabric (from Walmart, Hobby Lobby, or Jo-Anne Fabric) and simply adhere it to the wall. All in all, you want your lips to be the main attraction. Of course, you can always have the physical product in the picture as well - Be sure it is not blocking the beautiful application that took you 5 hours. And if you're anything like me, I loath painting my nails. We often fail to notice how they truly look. If you choose to showcase your hands holding the product, keep up with those at-home manicures ...or grab some stylish press-on nails.
You can even be a little flirty. Don't be afraid to blow a kiss, strike an Elvis lip (my fav!), or whatever it is your little heart desires.
Take aim ...
We don't want to see what's up your nose. Angles are key! If you choose to have a full face shown in your lip-selfie, dig into that makeup bag and cover all areas of the face. You want to make sure to tilt your chin down, eyes up, and hold your camera above you. You can also turn your head slightly to the right or left as if you were looking over your shoulder. You can go the other route, of course, a frontal view of just your mouth. When you do this, hold your camera straight out in front of your lips. This is going to you take more than just one attempt. So a tripod (for your phone or camera) is not a bad idea either.
If you use a camera, head on back to that manual that you've never laid a finger on. There you will find different camera settings to really make your photos pop!
Be a perfectionist ...
Let's rewind to the part where it took you 5 hours to apply that lip color. Whether you're showing off a soft pinky-rose, or a vibrant red, some products may make lip creases look more defined.
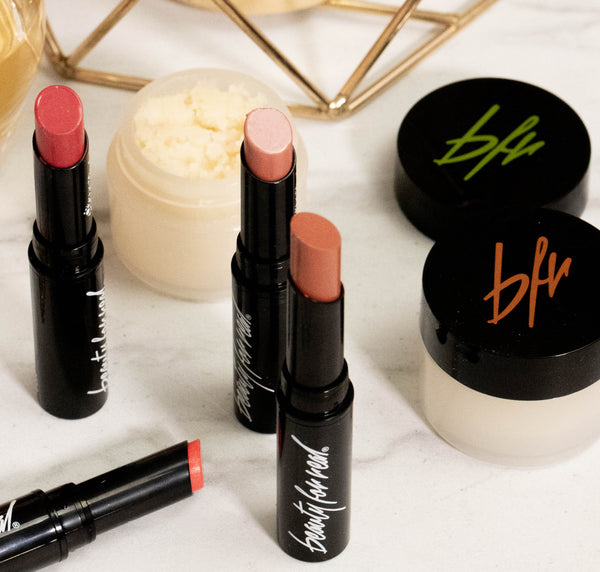
For example, my lips are more on the wrinkly side so I always use: a lip balm (Vaseline Lip Therapy), a lip mask (Nugg Hydrating Lip Mask), oil (Tarte Maracuja Oil), and I ALWAYS exfoliate (Beauty For Real Lip Revival Sugar Scrub) those bad boys. Another great thing to do, is to conceal around the mouth. Take a little bit of concealer (Tarte Maracuja Concealer or Tarte Shape Tape) onto a thin, flat brush (Sigma F66 Angled Buff or Sigma F75 Concealer Brush) and go around your lips and correct any uneven lines.
Tech to the rescue ...
Here's where you can go the extra mile. There is no such thing as perfect skin. I've been an Esthetician and Makeup Artist for 12+ years, and I have YET to see perfect skin, let alone lips. Not everyone can afford Photoshop because let's be honest, everyone edits their photos nowadays. But never fear, there's an app for that! For you iPhone users: Facetune is an app that costs $2.99. There are endless tools in this app, and it's actually pretty amazing. Photos really do look professionally edited. There is also a free version of Facetune called Facetune 2. This one works just as good as the paid version minus some tools here and there. Although, it still gets the job done. For those android users: Airbrush is a wonderful editing app. It reminds me a lot of Facetune 2. And for those laptop/desktop users: Pixlr is a free online editing tool. This is is probably the closest thing to Photoshop, but way easier to use.
And last but not least, roll with it and have fun. Be your amazing, creative, true self - And the rest will follow!
Written by Guest Beauty Blogger Aubrey Boyle @maidofbeauty
Bridal Beauty Trends
By Caitlyn Halliburton
It’s the most exciting time of the year...wedding season! If you're anything like my friends and I, you have a wedding to attend every other weekend (actually, I just went to two weddings, two weeks in a row). But this article isn't about the tales of supportive guests...it’s about our shining star...the bride. Yes, you beautiful, glowing-in-love woman, you, we're here to help.
No other day is special quite like today, and you know in a few short hours, heads will turn and all eyes will be on you. This is the beginning of your new life. Well, you can’t begin a new chapter without a flawless look. Your bridal makeup is a key component to stunning your friends, family, and of course, your anxious groom. Achieving your flawless wedding day beauty comes in just a few simple steps, with or without a makeup artist.
We know the weeks leading up to the big day can jam-packed and super stressful, so in order to ensure your skin is glowing and ready for the spotlight, it’s important to prepare a few weeks before you say “I do!”
First Thing’s First
This is your wedding. Treat yourself and your skin to a facial. By cleansing your skin, you can sleep easy knowing you won’t wake up with blemishes or pimples that even the best bridal makeup artist can't remedy. Reserve a spa day for you and your bridesmaids 4 or 5 days before you walk down the aisle so all the red and scarring that occurs post-facial will be healed and your face will be perfectly smooth.
Since you’re getting a facial anyway, go ahead and rub away pre-wedding stress with a massage or aromatherapy treatment. You’ll feel good, and looking good on your big day starts with feeling good.
If you decide to go with a makeup artist, make sure you schedule a few consultation appointments in advance, that way you and your artist have a good idea about what look you want to go with and what products will best suit your purpose and your skin.
However, if you’re the DIY bride, you can still achieve bridal beauty with these makeup tips below.
Bridal Makeup Tips and Tricks
With cameras flashing, nerves tingling, and plenty of dancing, primer will be your bridal makeup’s best friend. Primer goes on before your makeup, and it not only keeps your makeup fresh all day long, it also helps enhance pigments in your products, so you glow more.
Next, go with a concealer and foundation. Even if you don’t normally wear them, they will give your skin a pristine look in pictures. It’s important to note you’re going to apply more makeup than usual because of the flash photography. Those pictures are forever, and we don’t want you paying your photographer for more “touch ups” than necessary.
Now that you’ve got the basics, it’s time to figure what look you want to go for. If you’re anything like my happily-wedded girlfriends, you’ve perused Pinterest for hours searching for a bridal look to match your style. To make things easier for you, here are a few trendy bridal looks with some helpful tidbits to ease your mind.
The Glamorous Bride
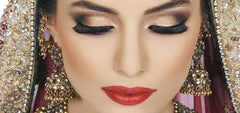 Are you the woman who says to yourself, “The more makeup the better?” Or perhaps you just want to go for a dramatic look on your big day, one that no one can take their eyes off of. This might be the look for you. The smoky eye with gold and black shadow are bound to shimmer down the aisle and through the dance floor, making their way to drop-dead gorgeous photos (like this one). The luscious red lips are sure to leave their mark, not just on your groom’s lips, but on everyone who encounters your smile.
Achieve this look:First highlight your brows with Beauty For Real’s Ever Starstruck Shadow STX, then trace your lids with All Day Latte. Use our all-time favorite Black Magic waterproof I-LINE to line the lids and fill in the corners of your eye. Act quickly! You will have to blend the eyeliner to achieve your desired look, and it sets fast. If the red seems like a little too much, no worries! Switching it out for Beauty For Real’s Nudist Lip Gloss + Shine will easily transform the look to a golden glam.
The Classic Hollywood Bride
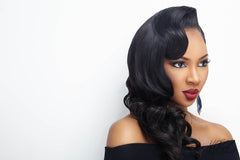
The aisle is your red carpet, and this is your chance to shine superstar! You simply cannot go wrong with this timeless, elegant look, and you’ll be admiring your wedding photos for years to come. The light eye makeup and dazzling red lips will turn heads, and most importantly, stun your incredible groom. Now, all you need is the perfect dress to complete this understated enchanting look.
Achieve this look: Our 24/7 waterproof I-LINE in Black Magic paired with our D-FINE Mascara make for the perfect minimized eye look. Paint your lips in our Really Red Lip Cream and you’re ready to strut your stuff all the way down to happily ever after!
The Sun-Kissed Bride
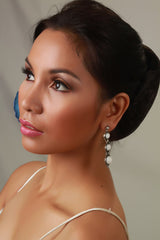
Are you the bride who dreams of a bright, springtime wedding? And you know nothing would complete your daydream more than equally beaming bridal makeup? Then this is the look for you. The natural eye and pink lip pair will highlight that charming smile of yours, making your groom melt for you like it’s the first date all over again.
Achieve this look: Delicately swipe on some of Beauty For Real’s D-FINE Mascara and highlight your cheeks with Blush + Glo to give your cheeks that radiant springtime glow. Complete the look with our Kiss Me Lip Gloss + Shine, and your groom will be pleading “kiss me” every chance he gets ;)
The Natural Bride
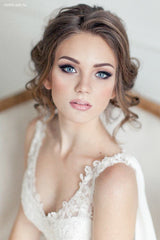
With just a little attention to the eyes and a natural lip, your beauty will sparkle even more than that gorgeous dress of yours. A natural look like this will go with any dress style, during any time of day, and you know it will remain incredible for years to come. If you’re not a big fan of makeup to begin with, this look might make you feel more comfortable for your big day, which means you get to have to more fun.
Achieve this look: Line your eyes with Beauty For Real’s I-LINE in Black Magic, smudge it a bit on your outer corners. If you’d like a little shimmer, apply Ever Starstruck Shadow STX first. Highlight your cheekbones with Blush + Glo and give your lips a naked shine with Nudist Lip Gloss + Shine.
Now all that's left is an elegant updo, your final dress fitting, and a deep breath before you head down the aisle into the arms of forever! Congratulations on your big day!
The Secret to Long Lasting Festival Makeup
As a self-proclaimed festival guru I must say, festival fashion is definitely one of my favorite parts about festival season. Even though I’m stoked about seeing the Red Hot Chili Peppers, Radio Head, Lady Gaga, and Justice perform live, planning my festival look and looking for makeup inspo is equally exciting.
As I plan for my festival season lineup, I think about my favorite festival-loving celebs like Vanessa Hudgens, my favorite Coachella fashion goddess, and the Ultra Angles, the super sleek rave queens. I think about my rave fam and all the tips we’ve learned throughout the years and wish we’d known to spare us those embarrassing pictures of looking a hot mess. These are the essentials of Festival Season 2017... simplified.
With experience comes wisdom, and I’ve learned that sometimes your perfectly put-together ensemble looks great for that first picture but by the end of your 12-hour sing-a-long dance-a-thon in the blazing sun...well, not so much. So here’s the 411 on how to keep your face looking fresh and put-together all day at your favorite summer festivals.
 Now, I love beauty products and my makeup collection is pretty extensive but I’ll admit I’m no make-up artist. Whenever I try something too crazy, I instantly regret it. It doesn’t look quite how I pictured and in a couple hours it definitely won’t look how I pictured (yikes!). I’ve learned that if you want to look amazing from start to finish, less is more! Plus, fuss-free looks are guaranteed to last longer. This is especially convenient considering there’s no mirrors in the bathrooms, you definitely don’t want to be there longer than you need to, and you wouldn’t want to miss any second of your perfect setimes schedule anyway.
Long Lasting Music Festival Makeup is easier than you think. Start off with a good waterproof SPF and then you’ll want something light for your cheeks. Heavy makeup will not only melt off but also clog your pores and cause breakouts so you’ll want to leave the foundation and contour kit at home. For beautiful skin all 3 days of non-stop fun, you need to let your skin breathe. Cream blush and cream highlighter, like Beauty For Real’s Blush + Glo, are perfect because the creamy consistency works over sunscreen and can be layered on to achieve your desired pigment. Don’t forget to bring face wipes with you in your fanny pack or satchel to freshen up every couple hours!
 Now for the eyes. The ultimate staple for any festival makeup look is colored eyeliner, and of course, it’ll need to be a sweat-proof, waterproof eyeliner pencil. Swap out your basic black or brown eyeliner for electric blue or metallic gold. The Beauty For Real I-LINE are absolutely the best colored pencils on the market. I wore my In The Navy to Ultra Miami, the absolute hottest and humid festival in the US, and I didn’t have to touch up once.
As for the lips, lip care should go above everything else. Lip scrub and moisturizing, long lasting lip gloss is all you’ll need to beat the heat. I prefer lighter colors on the lips because they won’t smudge and it’s easy to apply. My first time at EDC Vegas, my lips were chapped no matter how much chapstick I put on, even days after coming back from the festival. If only I’d known about Beauty For Real Natural Sugar Scrub. Since I discovered this amazing lip scrub, I always bring it with me and I’ve gotten all my friends hooked!
 Finish it off with some bling and setting spray! No rave outfit is complete without gems and glitter, my absolute favorite makeup accessory. The best part about it is there’s no wrong way to do it. I hold my gems with clear eyelash glue and they really don’t move (I may have fallen asleep with them and woke up like a true Glitter Queen once or twice…). Chunky glitter is all the rave right now, pun intended. Put it above your cheekbones, under your eyes, on your chest, go crazy with it. You’ll look fabulous, regardless. Lastly, every beauty-conscious ravers’ secret weapon for maximizing longwear makeup: setting spray.
For hair and body, you should still go for low maintenance. Flash tattoos are on my list of must-have festival accessories, along with a bandana and some sunnies. Flash tattoos stand out more on bronzed skin and last longer when your skin is moisturized. Last month at Coachella, both guys and girls were rocking these shiny temporary tats. In lieu of a choker or statement necklace, try a metallic strip on your neck or a couple accents on your collarbone. A fancy pattern on your sternum, back, or shoulder will have people blinded by your shine from all angles!
Beach waves hair, “the messy look,” or a man-bun inspired lady bun are all trendy and easy-to-do festival hair looks that will hold in place with a texturizing spray. And if you’re doing a camping festival you’ll definitely need to consider this option. This year for Okeechobee Festival, I curled my hair with a wand Friday afternoon before heading to the festival and the curls held all weekend with the help of my handy-dandy texturizing spray! It keeps hair from getting greasy and really holds.

Braids are another great up-do option. A simple french-braid is a great quick touch-up or if you want to get really edgy get box braid or corn rows with colored hair-add ins. You won’t have to worry about your hair all weekend! Another great festival tip is to start hair down on day 1 and gradually start picking up your hair. So maybe do some Zenon or Miley buns with your bangs on day 2, and a high pony on day 3. Bandanas are amazing because you can wear it around your neck for the pre-festival pic, use it on your hair when it gets too hot (it’s practically an outfit change right?), and even use it protect your nose and mouth from that dreaded festival dust.
My last festival tips is that every festival has it’s own culture, a certain vibe, a certain look. I love this about festivals because it gives me a chance to get creative. Not to mention my makeup and outfit perfectly coordinate with the surroundings for that perfect Insta pic.
 For example, when you think of Coachella or Lollapalooza, you’ll definitely want to go for Boho Chic. Bring out the brown eyeshadow and brown eyeliner, some gold eyeliner on the waterline, a statement hat, denim and boots. For EDC Vegas, Ultra, and Tomorrowland, you’ll want to go for street-style meets rave babe. Try a bodysuit with psychedelic print, space boots and colored eyeliner. For Burning Man, be bold, get creative! Desert weather is unpredictable; you have to be prepared for anything. Don’t be afraid to show some skin during the day and show off your bronzed body in the Playa and bundle up at night. Are you a techno girl? Go for grunge. Black eyeliner, black harness, throw in a green alien somewhere, black boots, and some more black wherever else you can fit it! Do some research, pick a theme, and make it your own! This will give you a starting point and plenty of ideas to work with.
Last but not least, whatever you wear, whatever you do, remember to be you! One of the best things about any music festival is how accepting the community is. My biggest mistake I made in my early festival days was trying to hard to fit the mold with my look. For example, when I went to Coachella for the first time, I over-accessorized. On Day 1, my outfit consisted of flowers, a hat, a lace top, rhinestones… it was just too much and poorly coordinated. As it turns out I had the best time on day 3 and snapped the best pictures in my last outfit, the one I put together last minute pulling random items from my luggage. I was comfortable, my look held up, and most importantly, I looked like me. You don’t want to be unrecognizable, you want to be the most beautiful version of yourself. Think of it like your wedding day but sooo much better. So remember, less is more!
Ultra and Coachella marked the beginning of summer festival season and if you’re following the looks like I am, on every social media imaginable, you’ll agree the FOMO is real. So how do you cope? Start planning your next festival venture and start shopping for your Festival essentials (this includes in your friends closets!). Try on outfits from head-to-toe, practice your makeup, take pictures and look back at the pictures a couple days later, don’t settle until you’re absolutely in love. That’s what I do! As for me, I’m off to Europe for Awakenings Festival and Ibiza Season. Beauty For Real, Bikinis, and Techno. Can you say LIVING?!
Leave a comment with your favorite festival look, the ultimate festival tips, or what you’re most excited for this festival season!
Eyeliner Etiquette
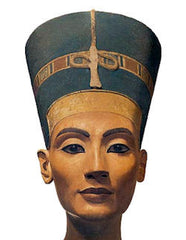 Did you know that eyeliner wasn’t always used for beauty? Back in the times of Pharaohs in Ancient Egypt, both men and women applied eyeliner to help protect their eyes from the Sun Gods and to defend against the “evil eye”. All this time, I thought Queen Nefertiti was way ahead of the game impressing everyone with her infamous beauty and perfect winged eyeliner.
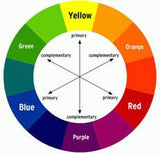 Locate your eye color on the wheel and whatever color you see on the opposite side of the circle will look great on your eyes. Now, it gets a little tricky, because brown, the most common eye color, doesn't actually appear on the wheel. However, most shades of brown eyes have specks of gold in them, so we can go ahead and call that yellow for our purposes. If you look opposite of yellow, you get purple. So, why does this work the way it does? Well, when colors that are complementary of each other are used together they look more intense, for example, eyeliners in the orange and yellow shades will enhance blue eyes while purple and blue liners enrich brown eyes. Give it a try!
With all these tips I think you're ready to take the throne next to history's very own King Tut, while batting your eyes with perfect winged liner to ward off any evil spirits.
Is the Unicorn Trend Here to Stay?
By Lyss Hollywood
At this point, we’ve all seen or heard about the new unicorn trend floating around the internet, making it’s way into the fashion, beauty, hair, and even food industries. If you’ve never heard of this trend, essentially, you must be living under a rock. Unicorn themes are being seen all over Instagram, Pinterest, and YouTube as well as ruling the red carpet and runways at fashion weeks. So where did this trend start, how did it grow into a phenomena, and how long will the unicorn trend be sustainable?
The first signs of the unicorn trend are seen as far back as 2012 with OG unicorners Katy Perry, Lady Gaga, Miley Cyrus, and Lisa Frank. Perry, a self-proclaimed unicorn, has always maintained a unicorn look with her ever-changing and multi-colored hair, but the singer can be seen upping her unicorn game since back in 2012. Around this time, Miley began wearing unicorn onesies, featuring them in her music videos and debuting a lot more colorful hairstyles as well. The ultimate unicorn look though, comes from none other than Gaga herself who transforms into one for an editorial shot by renowned photographer Steven Klein. 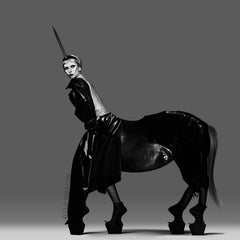
A collaboration between Lisa Frank and Urban Outfitters in 2012 gave a huge push on 90s nostalgia. Specifically, with colorful prints and animal themes, spawning a Lisa Frank nail art micro-trend during that time. For his Fall 2012 collection, Jeremy Scott even featured a look that was composed completely of Lisa Frank stickers. These are the beginnings of the unicorn trend that exploded into the phenomena it is today.
Unicorn love laid dormant for a few years before making it’s way to the masses and exploding into the trend we see today. This trend splashed into the faces of the public once again in spring and summer of 2016. We began to see unicorn inspired fashion on the red carpet and runway, unicorn liner, highlighter, brushes, glitter, the works! Valentino and Alexander McQueen debuted unicorn themed pieces on the runway in 2016, which were then seen styled on celebrities walking the red carpets and cruising around town. Nicole Kidman was photographed back in early 2016 on the red carpet of the American Country Music Awards wearing a colorful Alexander McQueen gown covered in unicorns and other animals. Later in the year, at the premiere of Suicide Squad, Margot Robbie was also seen in one of McQueen’s remarkable unicorn gowns. The unicorn embellishments and colors on the gowns added a whimsical and fantastical feel to the actresses’ looks. Jennifer Lopez and Emilia Clarke were also seen wearing unicorns on their ensembles in 2016, both rocking pieces from Valentino. From there, the fashion cycle commenced and the trend began to trickle down and across the fashion system amongst everyone--including both fashion leaders and followers.
The trend transcended into the beauty world with unicorn makeup, liners, highlighters, hair color, and many more products aimed at the unicorn lover in us all. Gigi Hadid debuted unicorn makeup during summer ‘16, blending iridescent blues, greens, pinks, and purples around her eyes with opalescent highlights on the cupids bow, cheek and brow bones. More recently, we’ve seen a unicorn hair trend featured many times on Chrissy Teigen and Shay Mitchell’s Instagrams. The look is a braided ponytail that resembles a unicorn horn when finished.
(To Get The Look: Place your hair in a high, tight ponytail. Spray your ponytail with Beauty For Real’s South Beach Spray to add texture and volume. Separate the ponytail into two pieces and twirl them together so they swirl and look like a horn! Now that you've transformed your pony into a horn, all that's left is makeup!)
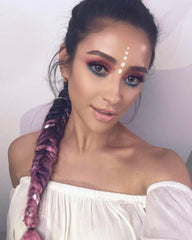
Shay Mitchell then teamed up with makeup artist Ariel Tejada to create a unicorn inspired Coachella look on YouTube. The look consists of pink tones on the upper lid and blue tones on the lower lash line, all of which are shimmery and give a lustrous look to the eyes. Ariel finished off Shay’s look by adding small dots to her forehead which resemble a unicorn horn and she was ready for Coachella.
(Get The Look: Place Beauty For Real’s Shadow STX in All Day Latte all over the upper eyelids and blend with your fingers. Then take the Shadow STX in Ever Starstruck underneath the brow bone for a highlight. For the lower lashline and waterline, take the 24/7 I-LINE in In The Navy and smudge it under the lashes. To give the unicorn horn effect, take the I-LINE in 24 Karat and create dots which get slightly smaller as you go towards the hairline. Top it all off with a luminous highlight on the high points of the face using Blush + Glo in Coral Crush + High Beam. And that’s it! You’ve recreated Shay Mitchell’s flawless unicorn Coachella look.)
At this point, you can’t help but ask yourself, “Why unicorns?” Well, fashionistas of the 20th and 21st century aren’t the only mystic-magic-lovers around. Unicorns have been revered for their beauty and grace since ancient times. In most accounts, they represent purity and strength, while commanding respect from mankind. The funny thing about unicorns is they actually aren’t considered mythological because...well, they don’t actually appear in any myths. Unicorns are documented in natural history by ancient Greek explorers who recounted their trips to the mysterious, exotic, and far-off land of India. We can’t be sure of what these travelers actually saw, but anthropologist have their theories. So...are unicorns real, then? Nothing wrong with holding on to a little bit of hope.
Whether you love it, hate it, or have a love-hate relationship with it, the unicorn trend is here to stay awhile. It's made it's way across industries into facets of our everyday lives as this millennial obsession continues to grow. Millennials have long been known to follow a “retro-fashion” cycle by reverting back to moments of nostalgia. Trends that reflect this retro feeling ultimately do extremely well and have a strong following. As an example, just take a look at the Polaroid boom that's also going on right now. Although we have modern technology that allows us to share our photos instantly, it's become trendy to go back to using Polaroids and getting an instant printed photo. The unicorn trend brings back feelings of our colorful childhood which is why it has stuck around and will continue to grow. In the age of 80s and 90s nostalgia, the unicorn is king, bringing millennials back to the time of Lisa Frank. Unicorns have officially taken over the fashion and beauty worlds, and have now begun their big move into the food industry. With hot cocoa, and cake, and coffee, oh my….
Fall 2016 Makeup Trends
Fall is finally here, and you know what that means: pumpkin spice lattes, cozy layers, and brand new makeup trends. It’s time to put away the pastel lip gloss and aqua eyeshadow and start fresh with darker, autumnal tones. Read on for the latest and greatest makeup trends this fall.
Bold, black eyeliner
As the leaves change colors, you can say “goodbye” to the softer look of summer in favor of edgier eye makeup. Tap into your inner teen angst with bold, black eyeliner on your top and bottom lids. Our black liner is perfect for this look because it is long-lasting and completely waterproof, so you don’t have to worry about smudgy raccoon eyes.
Glossy dark lips
This fall, you’ll see many a dark lip. Whether it’s plum, grape, wine, eggplant, or black cherry, darker shades are all the rage. Try our latest lip cream color, Night Before, for a long-wear, burgundy color that won’t dry out your lips.
Metallics
Metallics have been on-trend for all of 2016, and this fall is no exception. For a metallic look that will make your eyes pop, use our eyeshadow stick in Ever Starstruck on your eyelids, as well as your bottom waterline.
Dewy skin
Healthy, glowing skin is in style no matter the season, but this fall dewy complexions are all over the runways. Seamlessly add radiance to your face in seconds with our blush/luminizer.

At Beauty For Real, we offer makeup that lets you stay on trend without the time commitment. Whether it’s our black eyeliner or our eyeshadow sticks, our products are all designed to simplify your makeup routine. Ramp up your fall makeup wardrobe and shop Beauty For Real today!


